Monday, 27 February 2012

10 - Sails, and a bit of Rigging

Without benefit of assembly instructions - or any prior experience in building model ships, for that matter - I have been thinking about how to commence the assembly phase of this build, particularly when it came to the rigging. One of the articles I've read recommended installing the standing (black) rigging first, and then the running (white) rigging - assuming, of course, that you've already installed the masts and other related hardware.

However, I was a little reluctant to permanently install the masts, only to encounter a mistake or an omission and then have to try and correct my error. Also, anticipate that it's easier to work on the deck furniture without the added complication of booms and rigging in the way. Consequently, I've decided to mount the main and fore masts in a temporary "deck" (actually a short piece a 2x4) and install as many of the sails and associated rigging as possible before proceeding to other matters. Once I'm satisfied with the result, it will be a relatively simple matter (I hope) to move the completed mast assembly to the actual deck and continue with the rigging.

But before we get to that, a bit of a carry-over from my last post. Besides using the metal rings that I made for attaching the mast hoops to the sails, I also installed them on the three jibs.


After running lengths of standing rigging through the rings, the jibs are ready for installation.

Putting the jibs aside, it was time to install a few blocks for the main and fore sails. It shortly became apparent that my enthusiasm at repeatedly trying to thread the "rope" through the small holes in the blocks would rapidly wane. Fortunately, the holes were large enough that a piece of looped wire could snag the "rope" and pull it through.


This served to speed up the process considerably and this tactic will be useful throughout the build - provided the holes encountered don't get much smaller!

As it turned out, deciding to "mock up" the mast assemblies before permanently installing them was the right choice. When re-working the sails that had come with the original model, I had assumed that their dimensions were accurate to scale and neglected to double-check. This oversight came back to haunt me when I fitted the fore sail to the mast and discovered that it was too long. Trying to make it fit would result in the fore boom being positioned too close to the deck and the lifting blocks would end up touching - not exactly what I had in mind.

Several solutions involving re-sizing the sails were considered and discarded as either too time consuming, or possibly introducing other undesirable issues. The solution arrived at was to merely lengthen the fore mast by about an inch. A length of dowel, machined and bored, did the job, and one of the bands of the fore boom yoke will conceal the joint line. While this will result in a non-scale height for the mast, it will make the final assembly much more acceptable.


With that distraction out of the way, I could get on with mounting the sails and fitting hardware. Here are is where we are now; this is the fore sail.


Repeat once more for the main sail and then it's on to the top sails.

Pictures in the next post.


Sunday, 5 February 2012

09 - Sails

Have managed to get the sails pretty well sorted out in the last few days. Portions of this work have taken place at various times almost from the beginning, so this will be a summary of what has transpired to get to this point, which included removal of the original hardware, re-sewing the sails and the installation of more appropriate hardware, etc.

First of all, here is a shot of the original sails that came with the model. I've already removed the brass rings that had served to secure the sails to the masts.


The first order of business was to remove the brass eyelets. Here's a shot of the fore sail, showing how the eyelets detract from any scale appearance.


Once the eyelets were removed, the edge treatment of the sails left quite a bit to be desired, including the black thread edging (not on the full scale sail) and the non-scale appearance of the sewn edge. 


Without going into detail, I fashioned metal rings for all corners of each sail, leaving enough length in each "arm" to allow it to be glued to the sail. A boltrope was also sewn into each edge that would be fastened to a spar (booms or gaffs), or to which metal rings would be secured, either for attaching mast hoops to the sail or for securing the sail directly to standing rigging, eg, the jib to the jib stay.


I also removed the original reef lines from the main and fore sails - again, these were vastly out of scale and too few in number.


As a bit of an aside, there is a need for quite a few metal rings on this model, in various sizes. After making a few individually, I devised a way of essentially mass-producing them. Start with a metal rod of the appropriate size to produce the desired ring diameter - a drill bit serves nicely. Then wrap metal wire around this rod.


Once wrapped, use a cut-off disk on a Dremel tool to slice off the rings.


Repeat several times and you will have enough rings to meet your needs.


Here is a shot of a ring applied to a jib.


The following shots show the results of my efforts to date. Note the changes that I made to the top sails to correctly match the configuration of the full size sails. This is needed in order for the sails to clear the junction of the bottom and top masts. Mast hoops have now been installed on all sails as needed.


The main and fore sails fastened to the respective booms. Note the revised reefing lines.


As a last point, here are close-ups of the main and fore gaffs, again with the sails attached.


Next, I'll try and get the masts sorted.

Sunday, 22 January 2012

08 - Mast Hoops

This is another post to catch up on some of the build that I managed to get done some time ago.

One of the least faithful depictions (and there were many!) of the original model was the use of brass wire to represent the mast hoops - and then using only three of these for the main sail when the full size vessel has 15! As the mast hoops are a fairly prominent feature, I felt they warranted as much attention as the rigging blocks. Here is how I made them.

One of the references I found on-line described making the mast hoops from thin wood shavings. While this approach would obviously replicate very closely the structure of the full size hoops, I doubted that I would have the patience - or the skill - to produce satisfactory hoops in this manner.

Instead, I elected to form the hoops from rolled card stock. This simplified the basic procedure to one of rolling glued card stock around a suitably-sized form, and once dry, slicing rings (hoops) from the resultant tube to form the basis of the final item. Although I ended up painting the hoops after I had completed the assembly, I initially tried to reproduce a wood-grain pattern on the tube. While it looked OK on the tube, the pattern, such as it was, was not apparent once the slices were cut off and was a wasted step.

The following pictures show the sequence of steps. Again, having a lathe simplified the process but a similar approach could be taken using a power drill.

1. Dried and painted cardboard tube on the form and mounted on the lathe.


2. Showing thickness of rolled cardboard, about three-four sheets thick.


3. Preparing to cut off a mast hoop.


4. A potential mast hoop.


5. Formed wire, used to make the fastening ring.


5. Showing the fitting arrangement of the fastening ring and mast hoop.


6. Hole drilled in the mast hoop.


7.  Fastening ring inserted in the mast hoop, with the loop perpendicular to the edge.


8.  To finish off the mast hoop, I epoxied the wire inside the hoop and once dry, I painted the assembly. Tried to get a colour that matched the full-size hoop, but that proved harder that I had initially envisaged, and not fully satisfied with end result. But will live with it.

Here are a set of completed hoops, attached to the fore sail. The diameter of each hoop is large enough to cope with the thickness of the wire epoxied to the inside and once installed on the mast, the wire will not be visible. Also note the orientation of the attaching ring, which will correctly link with the sail ring when the hoop is on the mast and positioned horizontally. 


On to the sails.


Wednesday, 12 October 2011

07 - Making the Rigging Blocks - Part 2


In the last post, I described how I scaled and designed a template for the blocks. In this post, I'll describe the fabrication details for the two scale sizes that I eventually decided would be sufficient to represent the range of seven blocks on the full-size vessel. (Jenson listed 87 blocks, ranging in size from 6 inches to 13 inches.)

Having generated templates for the two sizes, these were then pasted on 1/4" X 1/8" strips of boxwood. For the smaller blocks, the long dimension was positioned across the strip; for the larger block, the long dimension was positioned lengthwise. The picture below shows some of the smaller blocks cut from the strip, ready for shaping.

Small block template applied to boxwood strip, ready for shaping.

Once separated, I used the Dremel tool with a mini-sanding drum to rough out the shape to the template.
Deremel tool, table-mounted with sanding drum. 

With a little manual sanding, the basic shape of the block was arrived at without too much difficulty.

Shaped boxwood block, ready for detailing. 

At this point, another decision was required. On the Bluenose II, the modern-style blocks do not have external stropping. This is in contrast to older blocks, which had an external band (or strap) to both hold the block together as well as attach the eyes (used to secure other hardware such as hooks, shackles,and thimbles to the block). Since I wasn't prepared to make a "built-up" block with internal hardware, the external stropping approach seemed the obvious way to go.

Besides, I think the stropping adds to the visual effect - without it, the blocks look a little bland.

(After build note: Although at this point in the build I was still intending to configure the model as the
Bluenose II, in the end, I decided to fit it out as the original Bluenose and so the stropped blocks look just right.)

After some experimentation, I settled on the following method to produce the blocks. First, drill a hole at one end of the block to represent the sheave, through which the rigging will run.

Drilling the sheave "hole".

Next, using a mini-rasp, add a grove along the edge of the block on both sides to further define the sheave.

  Detailing the sheave.

Finally, cut a grove on each side of the block to hold the stropping.

Cutting grove for stropping.

With these details done for all blocks, I started on the stropping. Twenty-seven gauge wire was used; anything smaller was unlikely to retain its shape when formed into eyes and subjected to the strains of rigging. Eyes were formed using a suitably size rod; in this case 1/16". A hole drilled into the building board held the rod and allowed me to form the eye. The following series of pictures are self-explanatory.

Rod and wire, ready to form an eye.

Two loops to form the eye.

Wire stropping applied to the block.


Securing the stropping.

With the stropping wire twisted secure and the excess cut off, the block is essentially finished. In those instances where an eye is needed at both ends, a loop of wire will be inserted at the other end.

Finished block. Tried an ink spot to simulate sheave axle. (Not applied to final versions.)

A dip in clear polyurethane was the final step.

Complete blocks dipped in urethane hanging to dry. 

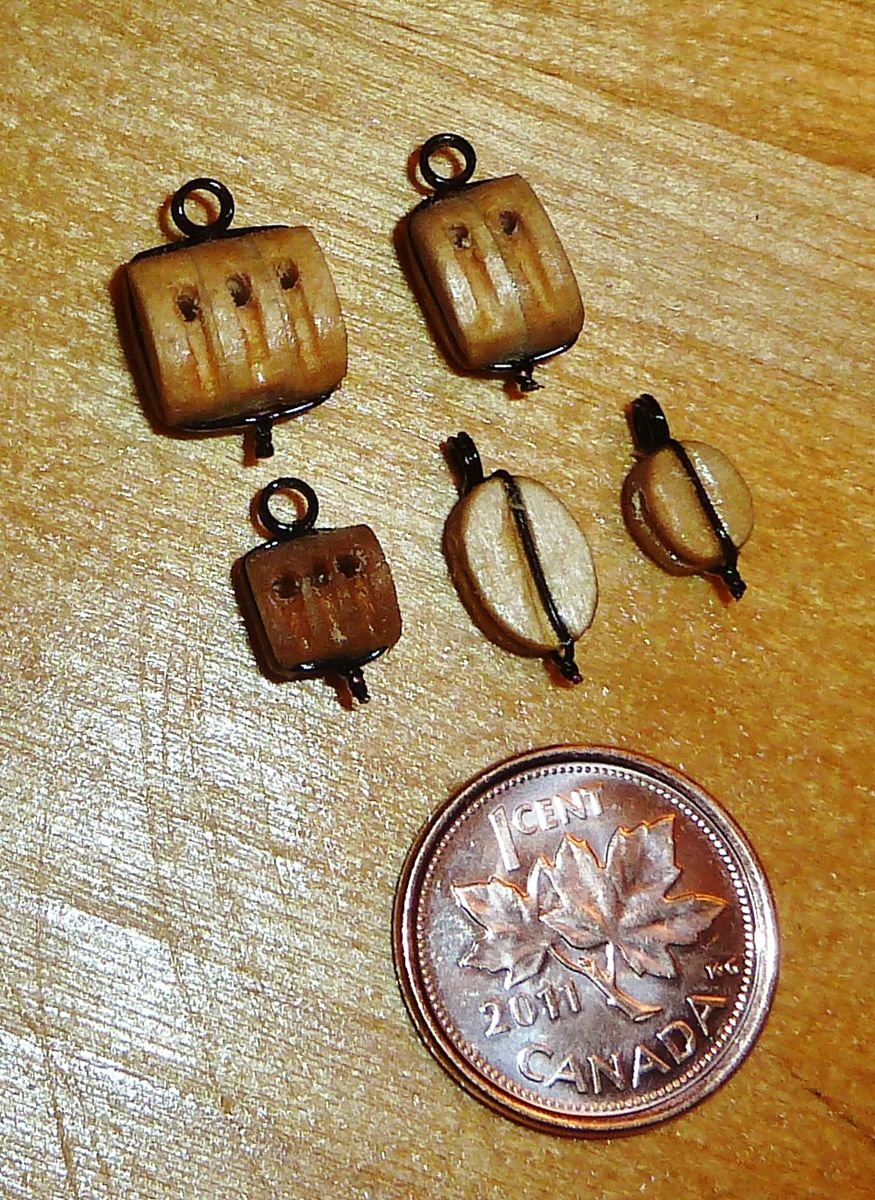
For double and triple sheave blocks, wood strips were glued together prior to shaping.

Completed one, two and three sheave large blocks and
single and three sheave small blocks.
The following pictures show a set of blocks assembled on one of the jibs for a test fit.

Single sheave small block.

Double sheave small blocks.

Next post: the sails.