
Original model blocks.
(Note: the two-hole versions were used to represent 'deadeyes'.)
The first thing I did was to ascertain how many blocks were used on the full-scale ship, as well as their sizes. Fortunately, Jenson concisely summarized the utilization of blocks on the Bluenose II (and their sizes) in the extract below. Notice that the size ranges from 6 inches to 13 inches, with the majority being single sheave but there are also a few double- and triple-sheave blocks as well.

Listing of rigging blocks used on the Bluenose II.
I was a little surprised at the range of sizes (6, 7, 8, 9, 10, 12 and 13 inches) and so the first decision was whether to try and replicate all the sizes in 1:44 scale. Didn't take me long to figure that most people would be hard pressed to distinguish between 0.136" and 0.205" (the full scale dimensions of 6" and 9" respectively) or 0.227" and 0.295 (full scale dimension of 10" and 13" respectively), particularly if the items weren't located side-by-side. So I elected to go with two sizes only, representing blocks in the 6" to 9" range with one size and blocks in the 10" to 13" range with a second size.
Next, I had to determine what to use as the source material. Seeing as the full-scale block is made of hardwood (usually oak), I initially tried to make the model blocks out of this type of wood.


Actual Bluenose II oak block.
Unfortunately, hardwood proved to be too difficult to shape, especially when dealing with something this small - and my limited skill level! Research on the internet revealed that boxwood was a good candidate material, and fortunately the craft store Michael's was a good source. I selected strips 1/4 inch wide by 1/8" thick. These dimensions would allow me to make two sizes of blocks, depending on whether the long dimension of the block was across the strip or parallel to the long dimension.
Now I had to determine the proper shape for the blocks. Having visited the Fisheries Museum of the Atlantic in Lunenburg, Nova Scotia (http://museum.gov.ns.ca/fma/en/home/default.aspx) several years ago, I had a photograph of one of the original Bluenose I blocks at my disposal.


Bluenose 1 block.
(Note pen for size measurement - didn't have a ruler with me on the day!)

Outline shape in red using MS Word drawing tools.

Block outline shape moved to the side.
Now it was a fairly simple matter to copy the shape to a blank MS Word page, draw several pairs of parallel lines a 1/4 inch apart and then size and position the block shapes accordingly.

Lines drawn 1/4"apart in MS Word.
(Note: Page was scaled to 200% - hence the screen ruler reads 0.5 inch. versus 0.25 inch.)

Large and small block shapes added to the page.
(Some additional detail added to make the outline more representative.)

Showing how the block shapes were inserted between the lines.
To make the production template, I merely copied and repeated each of the shapes on their own sets of parallel lines.
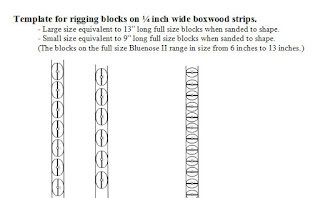

Production templates, ready to be cut and glued to boxwood strips.
Here is the template glued to one of the wooden strips and a stack of blocks cut from the strip and ready for shaping.


Block template applied to wood strips, with some already cut off, ready for shaping.
In Part B, I'll continue with the fabrication of the blocks.
No comments:
Post a Comment